Samsung has recently launched the Galaxy S10 series including Galaxy S10, S10+, S10e, and S10 5G this year. The company also introduced Galaxy Fold (foldable smartphone), Galaxy Watch Active, Galaxy Fit devices. Here in this guide, we will discuss how to take a screenshot on Galaxy S10 Plus and Galaxy S10e devices with some few and easy methods.
The Samsung Galaxy S10 series comes with the latest Android 9 Pie based on One UI custom skin out-of-the-box. While the South Korean manufacturer this time also provides some of the cool and new features like front camera cutout to its devices. If you’re changing your existing device with the new Galaxy S10 series models, you should need to know the ways to capture a screenshot on One UI.

Nowadays, taking a screenshot is quite useful and important as well for so many purposes. You can’t even think when and where that screenshot taking option will come in handy for you. Here we’re giving 4 easy and working methods to capture a screenshot on Galaxy S10, S10+, S10e, and S10 5G. Even these methods will also work expectedly on other Galaxy devices which’re running on One UI based on Android Pie.
Similar: Hide Galaxy S10 hole-punch camera cutout with these wallpapers
Steps to take a Screenshot on Galaxy S10 Plus and Galaxy S10e
Method 1: Hardware keys
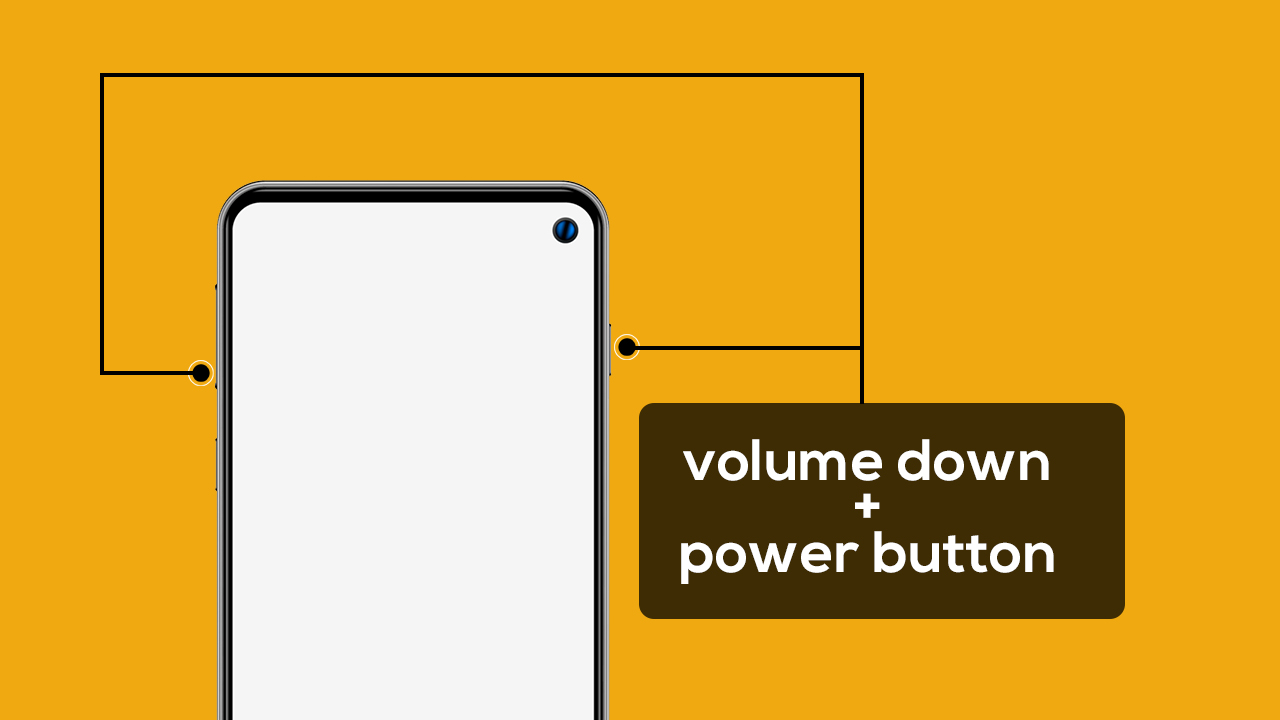
This is the most commonly and easily used by most of the Android device users to take a screenshot on any Android device. Each and every Android device come with this hardware keys combination method to capture screen easily. Follow the steps mentioned below:
- Open the screen which you want to capture > Press and hold the Power Button + Volume Down buttons together for a few seconds.
- This will capture that particular screen area easily with a preview where you can open/edit/delete that screenshot or you can also find the screenshot from the notification panel as well.
Method 2: Palm Swipe to capture
In order to capture a screenshot on your Galaxy S10 Plus and Galaxy S10e via Palm Swipe gesture, you need to enable that option first. Follow the steps:
- Go to Settings > Advanced features > Motions and gestures > turn on the toggle of Palm swipe to capture.
- After turning it on, open the screen which you want to capture and just swipe/move your palm across the screen at a normal speed.
- You’re done. The screenshot would be captured easily. Again you will find the recently taken screenshot on your notification panel.
Method 3: Tell Bixby Assistant to capture
All the Samsung Galaxy smartphones do come with Bixby Voice Assistant by default. Take a use of it. Here’s the step to use Bixby Assistant to take a screenshot:
- Browse and open the screen which you want to capture.
- Tap and hold the dedicated Bixby button and just tell – take a screenshot.
- Otherwise, if you don’t use Bixby that much then you need to activate Bixby by saying Hey Bixby and then say – take a screenshot.
Method 4: Tell Google Assistant
If you’re using an Android device and you don’t play with Google Assistant yet, then it’s time to start using it. Apart from the Bixby Assistant, Google Assistant is also a great option. Actually, it’s quite better in terms of task handler and searches assisting.
In order to take a screenshot via the Google Assistant, you need to follow the mentioned steps:
- Head over to the screen which you want to capture.
- Launch Google Assistant by pressing and holding the home key or swipe up and hold if you’re using the full-screen gestures.
- Once Google Assistant opens, tell – take a screenshot.
- Otherwise, if you use Google Voice Assistant then you need to only say Ok Google to open the Assistant and then tell take a screenshot.